7
Command Line Tools
7.1 Setting the Environment
ROS
relies on the notion of combining workspaces using the shell environment.
-
the core ROS workspace is called the underlay,
-
and any subsequent local workspaces are called overlays.
When developing with ROS , we will typically have several workspaces active concurrently.
Combining
workspaces
makes
developing
against
different
versions
of
ROS
,
or
against
different
sets
of
packages,
easier.
It
also
allows
the
installation
of
several
ROS
distributions
In other words, we won’t be able to use ROS . To source, simply type the following:
The exact command depends on where we installed ROS . Of course, if we have installed ROS using a docker container, this section can be skipped.
Sourcing
the
Script
If
we
don’t
want
to
have
to
source
the
setup
file
every
time
we
open
a
new
shell,
then
we
can
add
the
command
to
our
shell
startup
script:
.bashrc
Checking Environment Variables Sourcing ROS setup files will set several environment variables necessary for operating ROS . If we ever have problems finding or using our ROS packages, make sure that our environment is properly set up using the following command:
Information
:
The printenv
Command
Displays the values of environment variables.
Using
this
command
let’s
check
all
variables
like ROS_DISTRO
and ROS_VERSION
are
set.
ROS_VERSION=2
ROS_PYTHON_VERSION=3
AMENT_PREFIX_PATH=/opt/ros/humble
PYTHONPATH=/opt/ros/humble/lib/python3.10/site-packages:/opt/ros/humble/local/lib/python3.10/dist-packages
LD_LIBRARY_PATH=/opt/ros/humble/opt/rviz_ogre_vendor/lib:/opt/ros/humble/lib/aarch64-linux-gnu:/opt/ros/humble/lib
ROS_LOCALHOST_ONLY=0
PATH=/opt/ros/humble/bin:/usr/local/sbin:/usr/local/bin:/usr/sbin:/usr/bin:/sbin:/bin
ROS_DISTRO=humble
If the environment variables are NOT set correctly, it might be worthwhile to reinstall ROS .
The
ROS
Domain
ID
Variable
Once
we
have
determined
a
To
maintain
this
setting
between
shell
sessions,
we
can
also
add
the
command
to
our
shell
startup
script .bashrc
:
Changing
the
Localhost
Variable
By
default,
ROS
communication
is
NOT
limited
to
localhost.
ROS_LOCALHOST_ONLY
environment
variable
allows
us
to
limit
ROS
communication
to
localhost
only.
This means our ROS system, and its topics, services, and actions will NOT be visible to other computers on the local network.
Using ROS_LOCALHOST_ONLY
is
helpful
in
certain
settings,
such
as
classrooms,
where
multiple
robots
may
publish
to
the
same
topic
causing
strange
behaviors.
We
can
set
the
environment
variable
with
the
following
command:
Of
course,
to
maintain
it
across
different
shell
session
we
can
write
this
command
to
our .bashrc
:
7.2 Turtles and Graphs
Turtlesim is a great introduction to ROS as it is a lightweight simulator and easy to work on. It illustrates what ROS does at the most basic level to give us an idea of what we will do with a real robot or a robot simulation later on.
The ros2
tool is how the user manages, introspects, and interacts with a ROS system. It
supports multiple commands which target different aspects of the system and its operation.
One might use it to start a node, set a parameter, listen to a topic, and many more.
The ros2
tool is part of the core
ROS
installation and should already be installed. This can easily be tested by typing ros2
into a terminal.
The second tool is rqt, a
GUI
tool for
ROS
.
Everything done in rqt
can be done using
CLI
, but rqt
provides a more user-friendly way to manipulate
ROS
elements.
We will work together to understand the fundamental concept which build the core of ROS , like nodes, topics, and services. All of these concepts will be elaborated on later.
For now, we will simply set up the tools and get a feel for them.
Installing the Required Packages In case of NOT having a configured docker container which was discussed in detail previously, please use the following commands to install all the necessary packages.
To check if the package is installed, run the following command in the terminal:
which should return a list of turtlesim’s executable options:
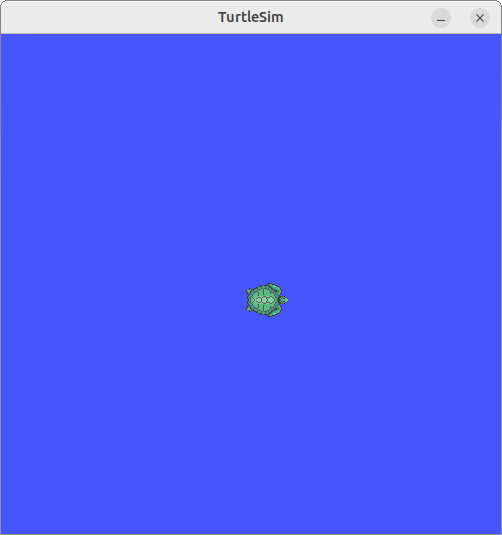
Installing and Starting Turtlesim Let’s begin the tutorial by starting turtlesim:
Under the command, we will see messages from the node. There we can see the default turtle’s name and the coordinates where it spawns.
The
simulator
window
should
appear,
with
a
random
turtle
in
the
centre.
Making
the
Turtle
Move
Around
Now,
At
this
point
we
should
have
three
-
a terminal running
turtlesim_node, -
a terminal running
turtle_teleop_key, and -
the turtlesim window itself.
Let’s
arrange
these
windows
so
we
can
see
the
turtlesim
window,
but
also
have
the
terminal
running turtle_teleop_key
active
so
that
we
can
control
the
turtle
in
turtlesim
using
the
arrow
keys
on
the
keyboard.
It
will
move
around
the
screen,
using
its
attached
“pen”
to
draw
the
path
it
followed
so
far.
Pressing an arrow key will only cause the turtle to move a short distance and then stop. This is because, realistically, we wouldn’t want a robot to continue carrying on an instruction if, for example, the operator lost the connection to the robot.
We can see the nodes, and their associated topics, services, and actions, using the list sub-commands of the respective commands:
~~ Node information ~~
/teleop_turtle
/turtlesim
~~ Topic information ~~
/parameter_events
/rosout
/turtle1/cmd_vel
/turtle1/color_sensor
/turtle1/pose
~~ Service information ~~
/clear
/kill
/reset
/spawn
/teleop_turtle/describe_parameters
/teleop_turtle/get_parameter_types
/teleop_turtle/get_parameters
/teleop_turtle/list_parameters
/teleop_turtle/set_parameters
/teleop_turtle/set_parameters_atomically
/turtle1/set_pen
/turtle1/teleport_absolute
/turtle1/teleport_relative
/turtlesim/describe_parameters
/turtlesim/get_parameter_types
/turtlesim/get_parameters
/turtlesim/list_parameters
/turtlesim/set_parameters
/turtlesim/set_parameters_atomically
~~ Action information ~~
/turtle1/rotate_absolute
Don’t worry about what this all means as we will have a detailed look into each of them in a later part.
Running
rqt
rqt
is
a
GUI
framework
which
implements
various
tools
and
interfaces
in
the
form
of
plugins.
If
it
is
not
installed
on
our
system
please
run
the
following
commands:
Once installed, running it is pretty straightforward:
When
running rqt
for
the
first
time,
the
window
will
be
blank.
This
is
normal.
To
see
what
is
currently
going
on
just
select Plugins/Services/Service Caller
from
the
menu
bar
at
the
top.
rqt
with
only
turtlesim
and
teleop
running.
Use
the
refresh
button
to
the
left
of
the
Service
dropdown
list
to
ensure
all
the
services
of
our
turtlesim
node
are
available.
Once
refreshed,
click
on
the
Service
dropdown
list
to
see
services
belonging
to turtlesim,
and
select
the /spawn
service.
Working
the
the
spawn
service
Let’s
use rqt
to
call
the /spawn
service.
We
can
guess
from
its
name
that /spawn
will
create
another
turtle
in
the
turtlesim
window.
Give
the
new
turtle
a
unique
name,
like turtle2,
by
double-clicking
between
the
empty
single
quotes
in
the
Expression
column.
We
can
see
that
this
expression
corresponds
to
the
value
of
name
and
is
of
type
string.
Next
enter
some
valid
coordinates
at
which
to
spawn
the
new
turtle,
like x = 1.0
and y = 1.0.
If
we
try
to
spawn
a
new
turtle
with
the
same
name
as
an
existing
turtle,
like
the
default
turtle1,
we
will
get
an
error
message
in
the
terminal
running turtlesim_node.
To
spawn turtle2,
we
then
need
to
call
the
service
by
clicking
the
Call
button
on
the
upper
right
side
of
the rqt
window.
If
the
service
call
was
successful,
we
should
see
a
new
turtle,
again
with
a
random
design.
spawn
at
the
coordinates
we
input
for x
and y.
If
we
refresh
the
service
list
in rqt,
we
will
also
see
that
now
there
are
services
related
to
the
new
turtle, turtle2,
in
addition
to turtle1.
Changing
the
Trail
Parameters
Now
let’s
give turtle1
a
unique
pen
using
the /set_pen
service:
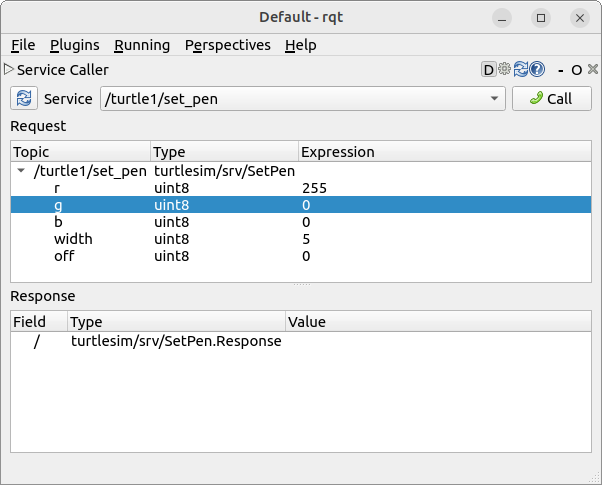
The
values
for r, g,
and b,
which
are
between
0
and
255,
set
the
colour
of
the
pen turtle1
draws
with,
and
width
sets
the
thickness
of
the
line.
To
have turtle1
draw
with
a
distinct
red
line,
change
the
value
of r
to
255,
and
the
value
of
width
to
5.
Don’t forget to call the service after updating the values.
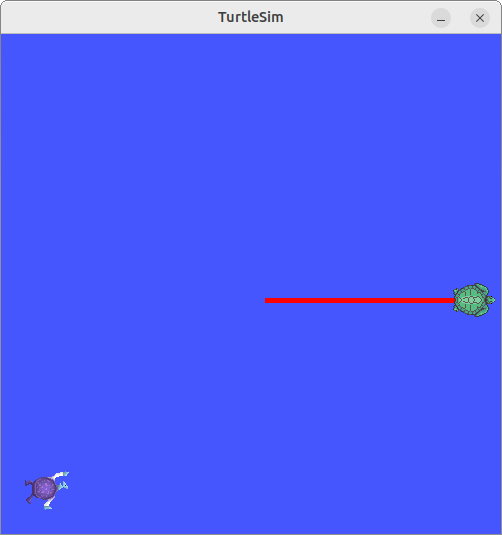
If
we
were
to
return
to
the
terminal
where turtle_teleop_key
is
running
and
press
the
arrow
keys,
we
will
see turtle1
’s
pen
has
changed
and
also
noticed
that
there’s
no
way
to
move turtle2.
That’s
because
there
is
no
teleop
node
for turtle2.
Remapping
Controls
We
need
a
second
teleop
node
in
order
to
control turtle2.
However,
if
we
try
to
run
the
same
command
as
before,
we
will
notice
that
this
one
also
controls turtle1.
The
way
to
change
this
behavior
is
by
remapping
the cmd_vel
topic.
To do that, In a new terminal, source ROS , and run:
Now,
we
can
move turtle2
when
this
terminal
is
active,
and turtle1
when
the
other
terminal
running turtle_teleop_key
is
active.
7.3 A Deeper Look into Nodes
Each node in
ROS
should be responsible for a
-
topics,
-
services,
-
actions, or
-
parameters.
A
full
robotic
system
is
comprised
of
many
interconnected
nodes
working
in
unison.
In
ROS
,
for
example,
a
single
executable
ros2
run
Now
let’s
put
all
this
knowledge
into
motion.
The
command ros2 run
launches
an
executable
from
a
package.
To run turtlesim, open a new terminal ( Ctrl + Alt + T ), and enter the following command:
Here,
the
package
name
is
turtlesim
and
the
executable
name
is turtlesim_node.
We
still
don’t
know
the
node
name,
however.
ros2
node
list
We
can
find
node
names
by
using ros2 node list,
which
will
show
us
the
names
of
all
running
nodes.
This
is
especially
useful
when
we
want
to
interact
with
a
node,
or
when
we
have
a
system
running
many
nodes
and
need
to
keep
track
of
them.
Open
a
new
terminal
while
turtlesim
is
Open another new terminal and start the teleop node with the command:
Here,
we
are
referring
to
the
turtlesim
package
again,
but
this
time
we
target
the
executable
named turtle_teleop_key.
Return to the terminal where we ran ros2 node list and run it again. We will now see the names of two active nodes:
Remapping a Node Remapping allows us to reassign default node properties:
like node name, topic names, service names, etc., to custom values.
Previously,
we
have
used
remapping
on turtle_teleop_key
to
change
the cmd_vel
topic
and
target turtle2.
Now,
let’s
reassign
the
name
of
our /turtlesim
node.
In
a
new
terminal,
run
the
following
command:
Since
we’re
calling ros2 run
on
turtlesim
again,
another
turtlesim
window
will
open.
However,
now
if
we
return
to
the
terminal
where
we
ran ros2 node list,
and
run
it
again,
we
will
see
three
ros2 node info Now that we know the names of our nodes, we can access more information about them with:
To
examine
our
latest
node, my_turtle,
run
the
following
command:
/my_turtle
  Subscribers:
   /parameter_events: rcl_interfaces/msg/ParameterEvent
   /turtle1/cmd_vel: geometry_msgs/msg/Twist
  Publishers:
   /parameter_events: rcl_interfaces/msg/ParameterEvent
   /rosout: rcl_interfaces/msg/Log
   /turtle1/color_sensor: turtlesim/msg/Color
   /turtle1/pose: turtlesim/msg/Pose
  Service Servers:
   /clear: std_srvs/srv/Empty
   /kill: turtlesim/srv/Kill
   /my_turtle/describe_parameters: rcl_interfaces/srv/DescribeParameters
   /my_turtle/get_parameter_types: rcl_interfaces/srv/GetParameterTypes
   /my_turtle/get_parameters: rcl_interfaces/srv/GetParameters
   /my_turtle/list_parameters: rcl_interfaces/srv/ListParameters
   /my_turtle/set_parameters: rcl_interfaces/srv/SetParameters
   /my_turtle/set_parameters_atomically: rcl_interfaces/srv/SetParametersAtomically
   /reset: std_srvs/srv/Empty
   /spawn: turtlesim/srv/Spawn
   /turtle1/set_pen: turtlesim/srv/SetPen
   /turtle1/teleport_absolute: turtlesim/srv/TeleportAbsolute
   /turtle1/teleport_relative: turtlesim/srv/TeleportRelative
  Service Clients:

  Action Servers:
   /turtle1/rotate_absolute: turtlesim/action/RotateAbsolute
  Action Clients:
ros2 node info
returns
a
list
of
subscribers,
publishers,
services,
and
actions.
Now
try
running
the
same
command
on
the /teleop_turtle
node,
and
see
how
its
connections
differ
from my_turtle.
7.4 Working with Topics
ROS breaks complex systems down into many modular nodes. Topics are a vital element of the ROS graph that act as a bus for nodes to exchange messages.
A node may publish data to any number of topics and simultaneously have subscriptions to any number of topics.
Topics are one of the main ways in which data is moved between nodes and therefore between different parts of the system.
To begin we start with a fresh new terminal ( Ctrl + Alt + T ) and type the following command:
And
of
course
we
would
like
to
control
this
turtle
so
we
need
to
add
the teleop
node
as
well.
Graphing
the
Topics
Throughout
this
tutorial,
we
will
use rqt_graph
to
visualize
the
changing
nodes
and
topics,
as
well
as
the
connections
between
them.
The
turtlesim
tutorial
tells
us
how
to
install
rqt
and
all
its
plugins,
including rqt_graph.
To
run rqt_graph,
open
a
new
terminal
and
enter
the
command:
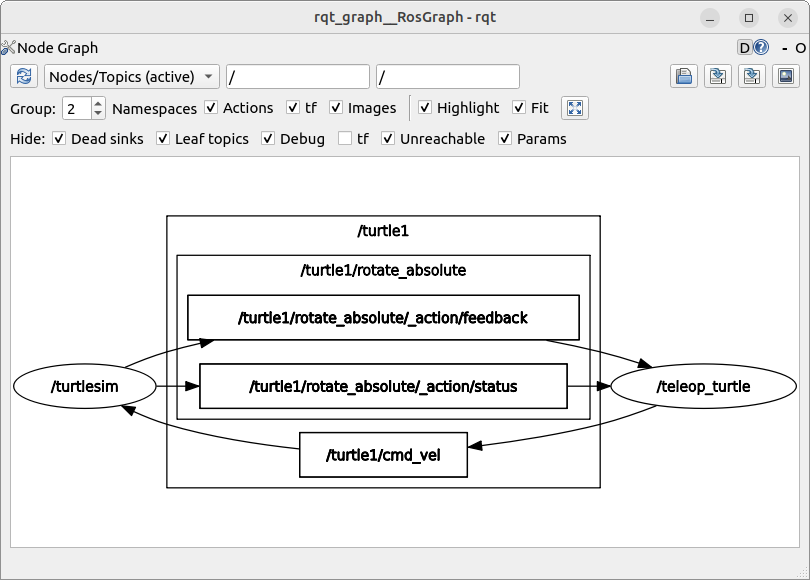
/turtlesim
and /teleop.
Wou
should
see
the
above
nodes
and
topic,
as
well
as
two
The
graph
is
depicting
how
the /turtlesim
node
and
the /teleop_turtle
node
are
communicating
with
each
other
over
a
topic.
The /teleop_turtle
node
is
publishing
data
/turtle1/cmd_vel
topic,
and
the /turtlesim
node
is
subscribed
to
that
topic
to
receive
the
data.
The
highlighting
feature
of rqt_graph
is
very
helpful
when
examining
more
complex
systems
with
many
nodes
and
topics
connected
in
many
different
ways.
ros2
topic
list
Running
the ros2 topic list
command
in
a
new
terminal
will
return
a
list
of
all
the
topics
currently
active
in
the
system:
Alternatively,
running ros2 topic list -t
will
return
the
same
list
of
topics,
this
time
with
the
topic
type
appended
in
brackets:
These attributes, particularly the type, are how nodes know they’re talking about the same information as it moves over topics.
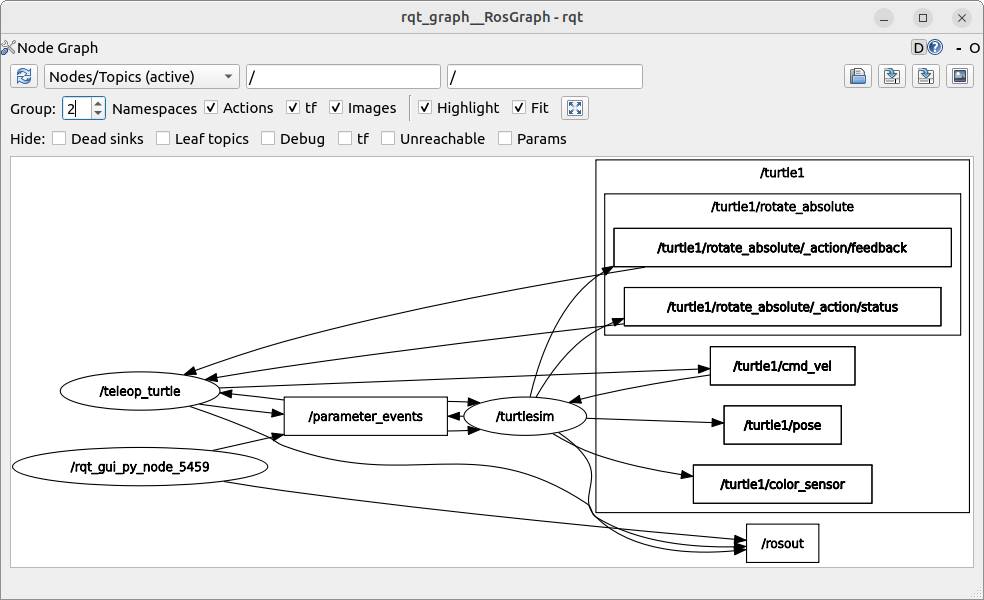
If
you’re
wondering
where
all
these
topics
are
in rqt_graph,
you
can
uncheck
all
the
boxes
under
Hide:
ros2 topic echo To see the data being published on a topic, use:
Since
we
know
that /teleop_turtle
publishes
data
to /turtlesim
over
the /turtle1/cmd_vel
topic,
let’s
use
echo
to
introspect
that
topic:
At
first,
this
command
won’t
return
any
data.
That’s
because
it’s
waiting
for /teleop_turtle
to
publish
something.
Return
to
the
terminal
where turtle_teleop_key
is
running
and
use
the
arrows
to
move
the
turtle
around.
Watch
the
terminal
where
your
echo
is
running
at
the
same
time,
and
you’ll
see
position
data
being
published
for
every
movement
you
make:
Now
return
to rqt_graph
and
uncheck
the
Debug
box.
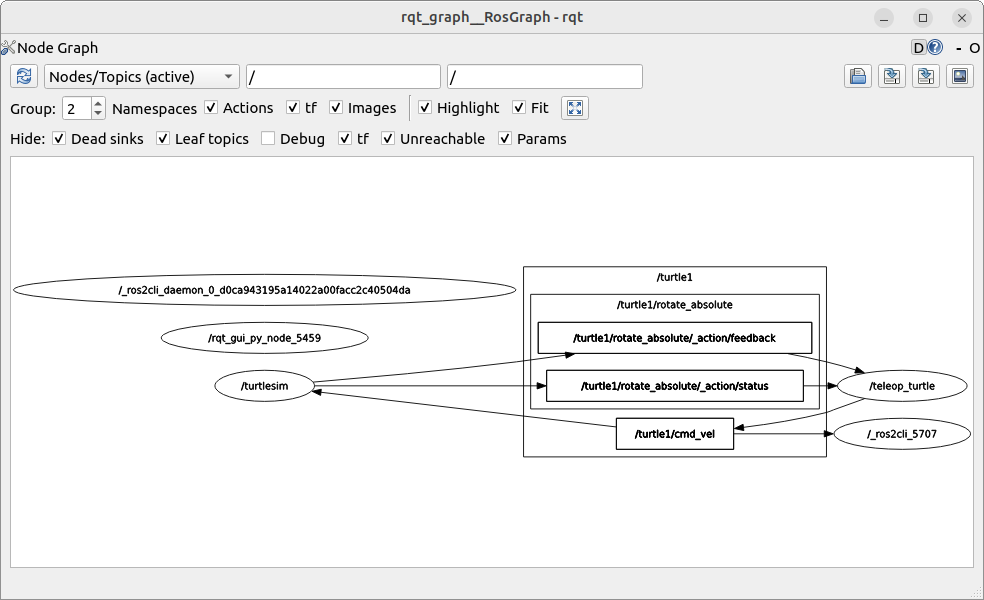
/_ros2cli_5707
is
the
node
created
by
the
echo
command
we
just
ran
(the
number
might
be
different).
Now
you
can
see
that
the
publisher
is
publishing
data
over
the cmd_vel
topic,
and
two
ros2 topic info Topics don’t have to only be one-to-one communication; they can be one-to-many, many-to-one, or many-to-many.
Another way to look at this is running:
ros2 interface show Nodes send data over topics using messages. Publishers and subscribers must send and receive the same type of message to communicate.
The
topic
types
we
saw
earlier
after
running ros2 topic list -t
let
us
know
what
message
type
is
used
on
each
topic.
Recall
that
the cmd_vel
topic
has
the
type:
This
means
that
in
the
package geometry_msgs
there
is
a
msg
called
Twist.
Now
we
can
run
ros2
interface
show <msg_type>
on
this
type
to
learn
its
details.
Specifically,
what
structure
of
data
the
message
expects.
Which will return
This
tells
you
that
the
/turtlesim
node
is
expecting
a
message
with
two
vectors,
linear
and
angular,
of
three
elements
each.
If
you
recall
the
data
we
saw /teleop_turtle
passing
to
/turtlesim
with
the
echo
command,
it’s
in
the
same
structure:
7.5 Working with Services
As a brief review, services are yet another method of communication for nodes in the ROS graph. Services are based on a call-and-response model versus the publisher-subscriber model of topics. While topics allow nodes to subscribe to data streams and get continual updates, services only provide data when they are specifically called by a client.
To
begin
we
start
with
a
fresh
new
terminal
(
Ctrl
+
Alt
+
T
)
and
type
the
following
command
to
start
the /turtlesim
and /teleop_turtle
nodes:
ros2
service
list
Running
the ros2 service list
command
in
a
new
terminal
will
return
a
list
of
all
the
services
currently
active
in
the
system:
/clear
/kill
/reset
/spawn
/teleop_turtle/describe_parameters
/teleop_turtle/get_parameter_types
/teleop_turtle/get_parameters
/teleop_turtle/list_parameters
/teleop_turtle/set_parameters
/teleop_turtle/set_parameters_atomically
/turtle1/set_pen
/turtle1/teleport_absolute
/turtle1/teleport_relative
/turtlesim/describe_parameters
/turtlesim/get_parameter_types
/turtlesim/get_parameters
/turtlesim/list_parameters
/turtlesim/set_parameters
/turtlesim/set_parameters_atomically
Looking
at
this
output
we
will
see
both
nodes
have
the
same
six
For now, let’s focus on the turtlesim-specific services:
-
/clear, -
/kill -
/reset -
/spawn, -
/turtle1/set_pen, -
/turtle1/teleport_absolute, and -
/turtle1/teleport_relative.
We
have
interacted
some
of
these
services
using rqt
previously.
ros2
service
type
Services
have
types
which
describe
how
the
-
one message for request,
-
another one for response.
To find out the type of a service, use the command:
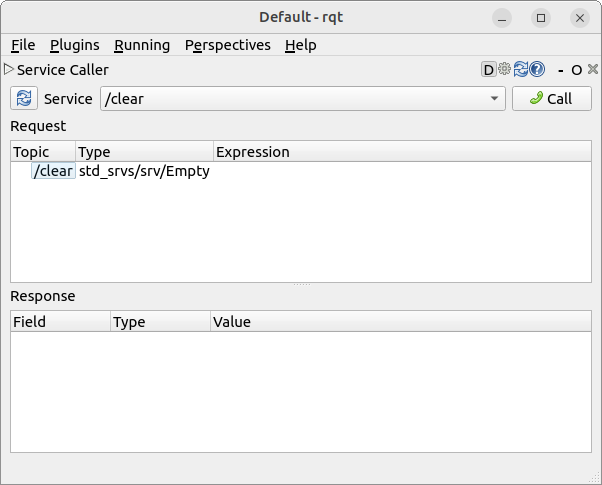
Let’s
take
a
look
at
turtlesim’s /clear
service.
In
a
brand
new
terminal,
let’s
enter
the
command:
In
this
context,
the Empty
type
means
the
service
call
sends
no
data
when
making
a
request
and
receives
no
data
when
receiving
a
response.
ros2
service
list
-t
To
see
the
types
of
all
the
active
services
at
the
same
time,
we
can
append
the --show-types
option,
abbreviated
as -t,
to
the
list
command:
ros2 service find If we want to find all the services of a specific type, we can use the command, which the syntax is as follows:
For
example,
we
can
find
all
the Empty
typed
services
like
this:
ros2 interface show We can call services from the command line, but first we need to know the structure of the input arguments. The syntax of the interface command is as follows:
Try
this
on
the /clear
service’s
type, Empty
:
The ---
separates
the
request
structure
(above)
from
the
response
structure
(below).
But,
as
we
learned
earlier,
the Empty
type
doesn’t
send
or
receive
any
data.
So,
naturally,
its
structure
is
blank.
Let’s
introspect
a
service
with
a
type
that
sends
and
receives
data,
like /spawn.
From
the
results
of ros2 service list -t,
we
know /spawn
’s
type
is turtlesim/srv/Spawn.
To
see
the
request
and
response
arguments
of
the /spawn
service,
run
the
command:
The
information
above
the ---
line
tells
us
the
arguments
needed
to
call /spawn. x, y
and theta
determine
the
2D
pose
of
the
spawned
turtle,
and
name
is
clearly
optional.
The information below the line isn’t something we need to know in this case, but it can help us understand the data type of the response we get from the call.
ros2 service call Now that we know what a service type is, how to find a service’s type, and how to find the structure of that type’s arguments, we can call a service using:
The <arguments> part is optional. For example, we know that Empty typed services don’t have any arguments:
This command will clear the turtlesim window of any lines our turtle has drawn. Now let’s spawn a new turtle by calling /spawn and setting arguments. Input <arguments> in a service call from the command-line need to be in YAML syntax.
Enter the command:
We will get this method-style view of what’s happening, and then the service response.
Our turtlesim window will update with the newly spawned turtle right away:
7.6 Working with Parameters
To
give
a
brief
refreshment,
a
parameter
is
a
In ROS , each node maintains its own parameters.
To begin we start with a fresh new terminal ( Ctrl + Alt + T ) and type the following command:
And
of
course
we
would
like
to
control
this
turtle
so
we
need
to
add
the teleop
node
as
well.
ros2
param
list
Now
that
both
of
them
are
running
/teleop_turtle:
  qos_overrides./parameter_events.publisher.depth
  qos_overrides./parameter_events.publisher.durability
  qos_overrides./parameter_events.publisher.history
  qos_overrides./parameter_events.publisher.reliability
  scale_angular
  scale_linear
  use_sim_time
/turtlesim:
  background_b
  background_g
  background_r
  qos_overrides./parameter_events.publisher.depth
  qos_overrides./parameter_events.publisher.durability
  qos_overrides./parameter_events.publisher.history
  qos_overrides./parameter_events.publisher.reliability
  use_sim_time
Every
node
has
the
parameter use_sim_time.
It
is
NOT
unique
to turtlesim.
Based
on
their
names,
it
looks
like /turtlesim
parameters
determine
the
background
color
of
the
turtlesim
window
using
RGB
color
values.
ros2
param
get
To
determine
a
type
of
the
parameter
we
are
trying
to
understand
let’s
use ros2 param get.
The
following
is
the
syntax
of
the
command
Now, let’s use this command to determine they type and the value of the parameter:
It
seems
the background_g
parameter
holds
an
integer
value.
If
we
were
to
run
the
same
command
on background_r
and background_b,
we
will
get
the
values
69
and
255
,
respectively.
ros2 param set Time to change these parameters and play around. To change a parameter’s value at runtime, use the command:
Let’s
do
something
simple
and
try
to
change
the /turtlesim
node’s
background:
The
background
of
our
turtlesim
window
should
change
colours.
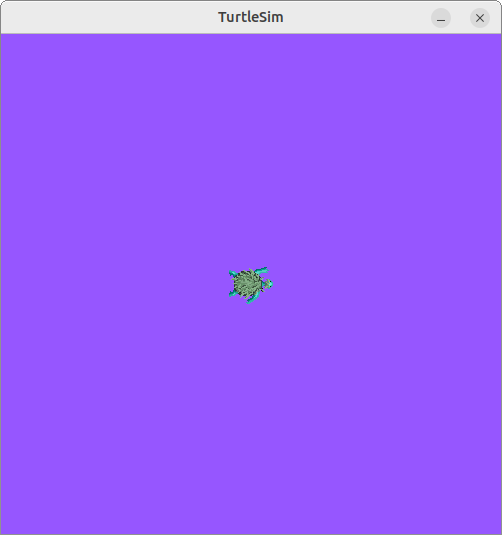
ros param set
we
were
able
to
change
the
value
of
the
parameter
and
change
the
background
to
a
nice
purple.
It
is
worth
mentioning
that,
setting
parameters
with
the
set
command
will
only
change
them
in
our
ros2 param dump
For this we need to dump this parameters to some other file for later use. Let’s have a look at
the ros2 param dump
command. This allows us to view all of a node’s current parameter values:
The command prints to the standard output (stdout) by default but we can also redirect the parameter values into a file to save them for later.
To save our current configuration of /turtlesim
parameters into the file turtlesim.yaml, enter the command:
In the current working directory we will find a new file. If we were to open this file, we’ll see the following content:
Dumping parameters comes in handy if we want to reload the node with the same parameters in the future.
ros2 param load Once the parameters are dumped into a file, we can load them to a currently running node using the command:
To load the turtlesim.yaml
file we just generated with ros2 param dump
into /turtlesim
node parameters, we just have to enter the command:
Set parameter background_b successful
Set parameter background_g successful
Set parameter background_r successful
Set parameter qos_overrides./parameter_events.publisher.depth failed: parameter 'qos_overrides./parameter_events.publisher.depth' cannot be set because it is read-only
Set parameter qos_overrides./parameter_events.publisher.durability failed: parameter 'qos_overrides./parameter_events.publisher.durability' cannot be set because it is read-only
Set parameter qos_overrides./parameter_events.publisher.history failed: parameter 'qos_overrides./parameter_events.publisher.history' cannot be set because it is read-only
Set parameter qos_overrides./parameter_events.publisher.reliability failed: parameter 'qos_overrides./parameter_events.publisher.reliability' cannot be set because it is read-only
Set parameter use_sim_time successful
Read-only parameters can only be modified at startup and not afterwards, that is why there are some warnings for the qos_overrides
parameters.
Loading Parameters on Startup To start the same node using our saved parameter values, use:
This is the same command we always use to start turtlesim, with the added flags --ros-args
and --params-file, followed by the file we want to load.
To test this out, stop our running turtlesim node, and try reloading it with our saved parameters, using:
The turtlesim window should appear as usual, but with the purple background we set earlier.
When a parameter file is used at node startup, all parameters, including the read-only ones, will be updated.
7.7 A Practical Look into Actions
Actions are one of the communication types in ROS and are intended for long running tasks. They consist of three parts: a goal, feedback, and a result.
Actions are built on topics and services. Their functionality is similar to services, except actions can be canceled. They also provide steady feedback, as opposed to services which return a single response.
Actions use a client-server model, similar to the publisher-subscriber model (described in the topics tutorial). An “action client” node sends a goal to an “action server” node that acknowledges the goal and returns a stream of feedback and a result.
To begin we start with a fresh new terminal ( Ctrl + Alt + T ) and type the following command:
And of course we would like to control this turtle so we need to add the teleop
node as well.
When we launch the /teleop_turtle
node, we will see the following message in our terminal:
Let’s focus on the second line, which corresponds to an action. Pay attention to the terminal where the /turtlesim
node is running. Each
time we press one of these keys, we are sending a goal to an action server that is part of the /turtlesim
node. The goal is to rotate the
turtle to face a particular direction. A message relaying the result of the goal should display once the turtle completes its rotation:
The F key will cancel a goal mid-execution.
Try pressing the C key, and then pressing the F key before the turtle can complete its rotation. In the terminal where the /turtlesim node is running, we will see the message:
Not only can the client-side (our input in the teleop) stop a goal, but the server-side (the /turtlesim node) can as well. When the server-side chooses to stop processing a goal, it is said to “abort” the goal.
Try hitting the D key, then the G key before the first rotation can complete. In the terminal where the /turtlesim node is running, we will see the message:
This action server chose to abort the first goal because it got a new one. It could have chosen something else, like reject the new goal or execute the second goal after the first one finished. Don’t assume every action server will choose to abort the current goal when it gets a new one.
ros2 node info
To see the list of actions a node provides, /turtlesim
in this case, open a new terminal and run the command:
/turtlesim
  Subscribers:
    /parameter_events: rcl_interfaces/msg/ParameterEvent
    /turtle1/cmd_vel: geometry_msgs/msg/Twist
  Publishers:
    /parameter_events: rcl_interfaces/msg/ParameterEvent
    /rosout: rcl_interfaces/msg/Log
    /turtle1/color_sensor: turtlesim/msg/Color
    /turtle1/pose: turtlesim/msg/Pose
  Service Servers:
    /clear: std_srvs/srv/Empty
    /kill: turtlesim/srv/Kill
    /reset: std_srvs/srv/Empty
    /spawn: turtlesim/srv/Spawn
    /turtle1/set_pen: turtlesim/srv/SetPen
    /turtle1/teleport_absolute: turtlesim/srv/TeleportAbsolute
    /turtle1/teleport_relative: turtlesim/srv/TeleportRelative
    /turtlesim/describe_parameters: rcl_interfaces/srv/DescribeParameters
    /turtlesim/get_parameter_types: rcl_interfaces/srv/GetParameterTypes
    /turtlesim/get_parameters: rcl_interfaces/srv/GetParameters
    /turtlesim/list_parameters: rcl_interfaces/srv/ListParameters
    /turtlesim/set_parameters: rcl_interfaces/srv/SetParameters
    /turtlesim/set_parameters_atomically: rcl_interfaces/srv/SetParametersAtomically
  Service Clients:

  Action Servers:
    /turtle1/rotate_absolute: turtlesim/action/RotateAbsolute
  Action Clients:
The command returns a list of /turtlesim’s subscribers, publishers, services, action servers and action clients.
Notice that the /turtle1/rotate_absolute
action for /turtlesim
is under Action Servers. This
means /turtlesim responds to and provides feedback for the /turtle1/rotate_absolute
action.
The /teleop_turtle
node has the name /turtle1/rotate_absolute
under Action Clients meaning that it sends goals for that action name. To see that, run:
/teleop_turtle
  Subscribers:
    /parameter_events: rcl_interfaces/msg/ParameterEvent
  Publishers:
    /parameter_events: rcl_interfaces/msg/ParameterEvent
    /rosout: rcl_interfaces/msg/Log
    /turtle1/cmd_vel: geometry_msgs/msg/Twist
  Service Servers:
    /teleop_turtle/describe_parameters: rcl_interfaces/srv/DescribeParameters
    /teleop_turtle/get_parameter_types: rcl_interfaces/srv/GetParameterTypes
    /teleop_turtle/get_parameters: rcl_interfaces/srv/GetParameters
    /teleop_turtle/list_parameters: rcl_interfaces/srv/ListParameters
    /teleop_turtle/set_parameters: rcl_interfaces/srv/SetParameters
    /teleop_turtle/set_parameters_atomically: rcl_interfaces/srv/SetParametersAtomically
  Service Clients:

  Action Servers:

  Action Clients:
    /turtle1/rotate_absolute: turtlesim/action/RotateAbsolute
ros2 action list To identify all the actions in the ROS graph, run the command:
This is the only action in the ROS graph right now. It controls the turtle’s rotation, as we saw
earlier. We also already know that there is one action client (part of /teleop_turtle
) and one action
server (part of /turtlesim
) for this action from using the ros2 node info <node_name>
command.
ros2 action list -t
Actions have types, similar to topics and services. To find /turtle1/rotate_absolute
’s type, run the command:
In brackets to the right of each action name (in this case only /turtle1/rotate_absolute
) is the action type,
turtlesim/action/RotateAbsolute. We will need this when we want to execute an action from the command line or from code.
7.8 Launching Nodes
Up to now, we have been opening new terminals for every new node we ran. As we create more complex systems with more and more nodes running simultaneously, opening terminals and reentering configuration details becomes tedious.
Launch files allow we to start up and configure a number of executables containing ROS nodes simultaneously.
Running
a
single
launch
file
with
the
ros2
launch
command
will
start
up
our
entire
system
This command will run the following launch file:
from launch import LaunchDescription
import launch_ros.actions


def generate_launch_description():
   return LaunchDescription([
      launch_ros.actions.Node(
         namespace='turtlesim1', package='turtlesim',
         executable='turtlesim_node', output='screen'),
      launch_ros.actions.Node(
         namespace='turtlesim2', package='turtlesim',
         executable='turtlesim_node', output='screen'),
   ])
The launch file above is written in Python, but we can also use XML and YAML to create launch files. We can see a comparison of these different ROS launch formats in Using XML, YAML, and Python for ROS Launch Files.
If
this
is
working
well,
then
we
should
see
two
turtlesim
environments
popping
up.
This
will
run
two
Controlling the Nodes Now that these nodes are running, we can control them like any other ROS nodes. For example, we can make the turtles drive in opposite directions by opening up two additional terminals and running the following commands:
In a second terminal:
In a third terminal:
After running these commands, we should see the two turtles in their respective envrionment spinning like a record.